Sometimes system administrators are faced with a problem such as the procedure for migrating mailboxes from Workspace to Microsoft 365. This is by no means a trivial process, and very careful preparation is required to carry it out. Of course, the planning process varies greatly depending on the size and structure of the organization needing the migration. Usually, the larger the company the more time and resources it takes to complete the transfer of mail data.
The process of mail data migration consists of many essential points. Each of these should be carefully studied and analyzed before beginning data transfer. But the most recurring question remains the same: how to migrate all mail accounts without disrupting service to the entire company?
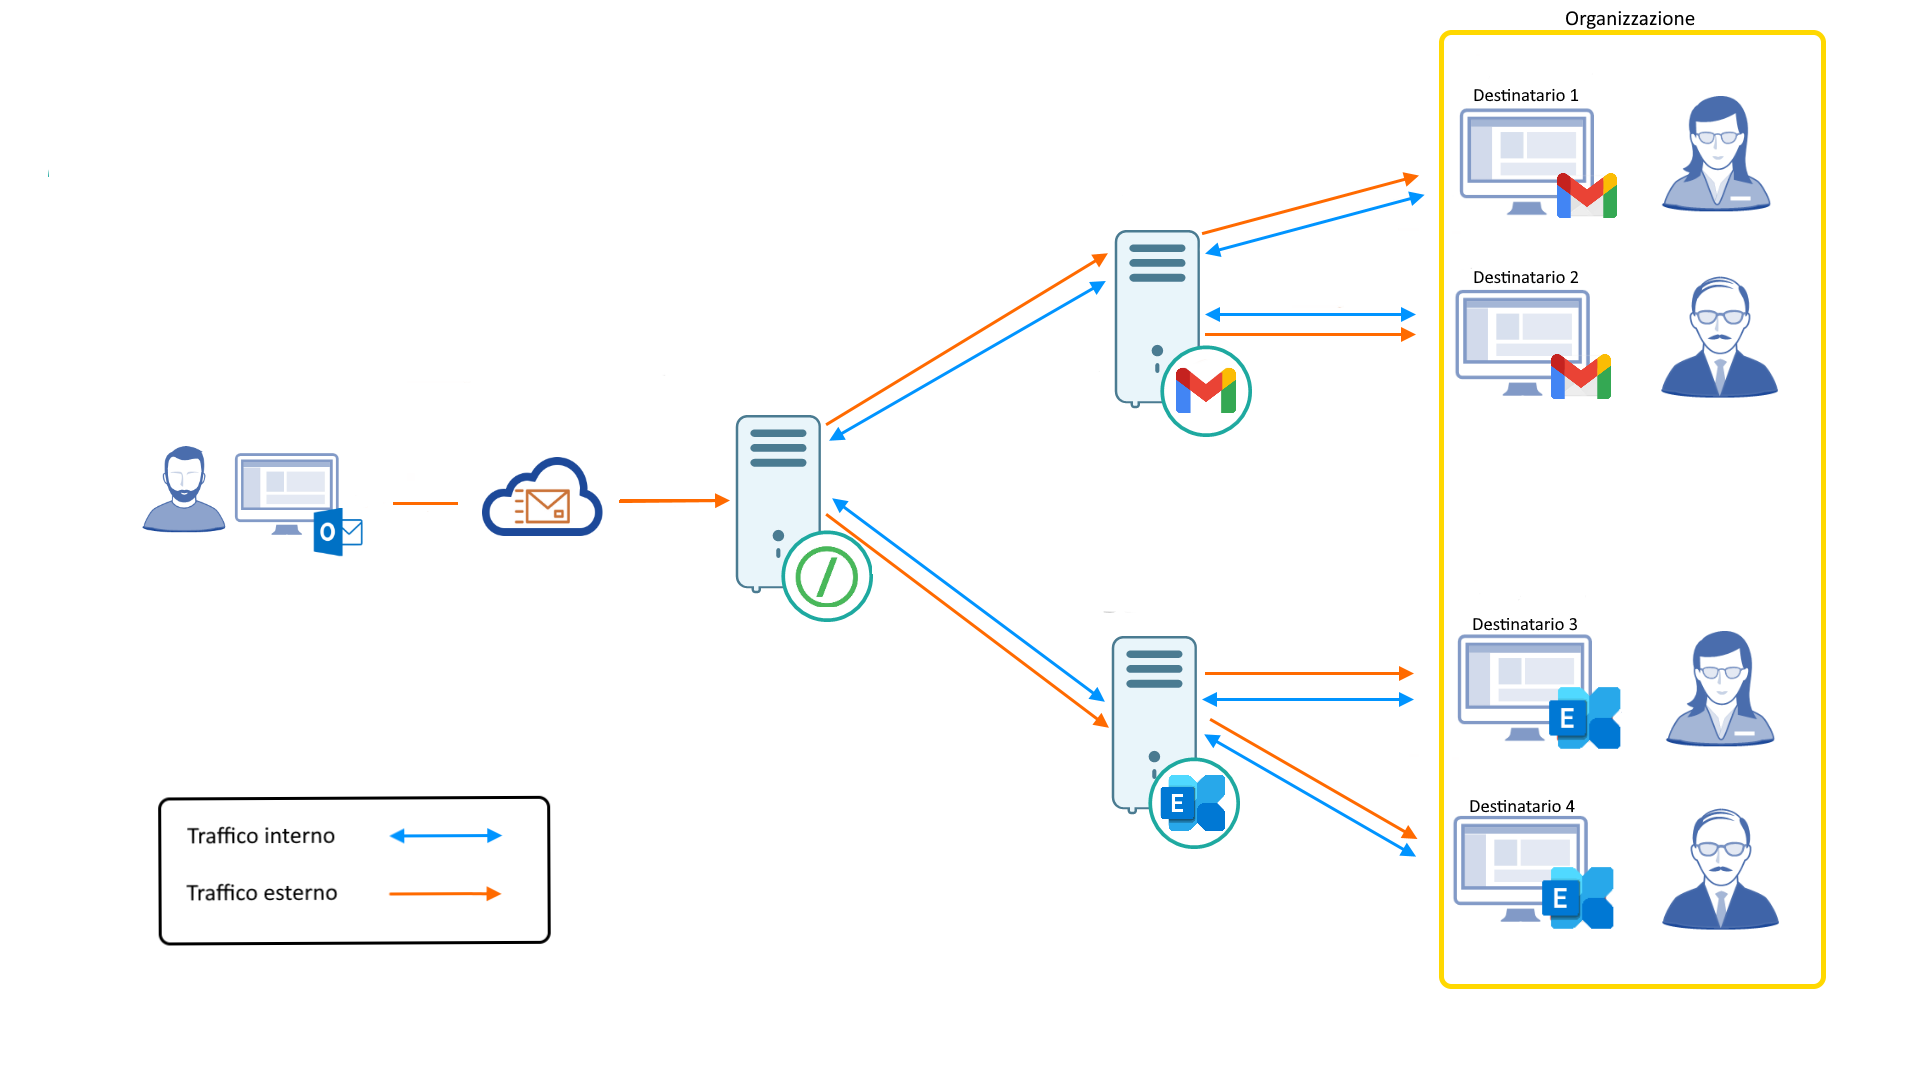
What makes this migration method innovative is the ability to migrate from one mail system to another while keeping both systems active . In addition, you can continue to receive and send mail without losing any e-mail.
Utixo has designed migrations from several source e-mail systems. But in this specific case, it is explained how to migrate from Gmail to Microsoft 365. All this without having to reconfigure all clients immediately, but by migrating mailboxes in small groups or even doing user-by-user switching. During the process, the following is preserved
always the correct flow of mail,
taking advantage of Utixo’s Libraesva email security service.
In fact, Utixo’s email security suite as a service allows the SMTP flow to be routed not by domain, but by individual email. This allows some e-mails to be forwarded to one service (Workspace) and others to the other service (Microsoft 365).
Clearly this applies to other types of mail servers as well, so it is a useful tool for mail migrations in general.
Here is a brief overview of the migration tools needed to proceed:
- Google Workspace administrator account that can change the configuration of the Gmail service, or a Super Administrator account.
- Microsoft 365 administrator account capable in changing the configuration of the Exchange Online service, or a Global Administrator account.
- Libraesva as a service Utixo, or a configured and ready-to-use installation of Libraesva Email Security Gateway (LESG). This plays an important role in sorting mail traffic during migration.
- Access to the DNS zone of the domain that is to be migrated.
Step 1.
Configure
Libraesva
ESG as the primary MX record
First reassure yourself that current mail traffic goes through Libraesva ESG (if ESG filtering is already active on your domain, go to Step 2).
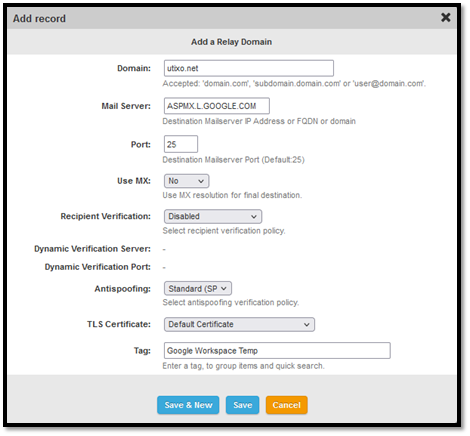
To do this you need to configure a new relay domain on ESG in the
System
->
Mail Transport
->
Relay Configuration
->
Domain Relay
by clicking the
New
.
In the window that opens you need to fill in the following fields:
Domain
: your main domain on which the Gmail service is currently configured.
Mail Server
: the hostname of the mail server to which ESG is to deliver messages (in our case it is the address of the Google Workspace mail server).
Port
: 25.
Use MX
: no.
All other fields can remain unchanged, since they they are not necessary for this procedure.
Step 2. Inbound Gateway Configuration on Google Workspace
Once you have set up the domain on ESG, you need to set up an Inbound Gateway on Google Workspace so that all outbound traffic from ESG is accepted by the Gmail service.
- Access the Google Workspace administration interface https://admin.google.com/.
- Enter the Application section -> Google Workspace -> Gmail -> Spam, phishing and malware.
- Activates the Inbound Gateway by entering the IP addresses of the ESG host.
- Check the box “Reject all mail that does not come from IP gateway” which forces Google to send the internal mail stream to ESG.
Immediately after configuring the Inbound Gateway on Gmail replace the current MX record (the Google one), going to put in the ESG hostname, to have the mail stream routed from Libraesva.

Step 3. Configuring Inbound Connector for Exchange Online
In this step you create an Exchange Online Receive Connector in order to receive mail messages from ESG.
- Access the Exchange Online management interface.
- In the sidebar, select Mail Flow -> Connectors.
- In the Connectors section click on Add a connector.
- Connection from Partner Organization -> Office 365.
- Click the Next button.
- Assign it a name and click Next.
- Select the “Verifying that the IP address of the sender’s server matches…” item. Enter one or more IP addresses of your ESG installation and then click Next.
- Check the box “Reject e-mail messages if they are not sent with TLS” and click Next.
- Double-check the configuration and click Create Connector.
Once you have configured the receiving connector, you need to change the type of our Accepted Domain from Authoritative to Internal Forwarding. This causes the Microsoft Exchange server to send internal mail to our MX for recipients not within Microsoft 365.
In this guide, it is assumed that the network administrator has already configured the primary domain within Tenant 365. If you haven’t already done so, follow Microsoft’s official guide: https://docs.microsoft.com/en-us/microsoft-365/admin/setup/add-domain.
- Access the Exchange Online management interface: https://admin.exchange.microsoft.com.
- In the sidebar, select Mail Flow -> Accepted Domains.
- Select your primary domain and set it as Internal Forwarding and Save Change.
Step 4. Migrating mailboxes from Workspace to Microsoft 365
After you have completed all the essential configurations of the three environments involved in the migration from Google Workspace to Office 365 (now Microsoft 365), you can finally proceed with the mailbox transition.
- Identifies the mail accounts to be transferred. There is no generic rule by which mailboxes to be transferred must be selected. Each IT manager makes his own choices based on the business environment and his needs.
- Create mailboxes on Microsoft 365. The mail accounts you want to transfer should be created in Exchange Online. Then, users must be created in the M365 tenant with the corresponding licenses. If you need to purchase Microsoft 365 licenses see Utixo’s price list: https://utixo.net/it/microsoft-365/.
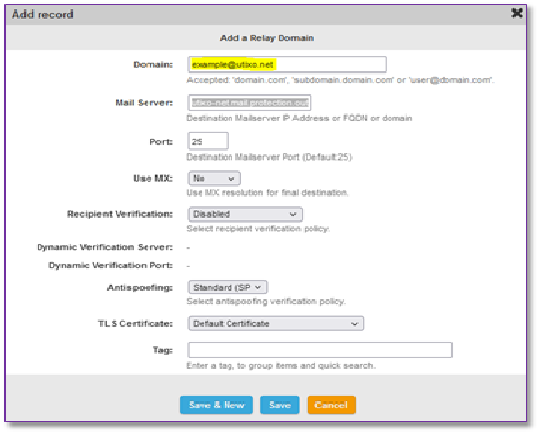
- Reconfigure mail routing on ESG. When your Microsoft 365 account is ready to use, you can begin moving the related mail stream to Exchange Online. You can do this through the ESG control panel:
- Enter the ESG administration panel.
- Navigate to System -> Mail Transport -> Relay Configuration -> Domain Relay.
- Create a relay rule for the user you want to migrate by entering their primary e-mail address in the Domain field.

- Enter the hostname of your Exchange Online mail server in the Mail Server field.
- Verify that SMTP routing is working properly. Make a test of sending/receiving mail messages from both external and internal domains.
- Performs data shifting. If one wanted to keep all messages currently in Google Workspace accounts, one could use automatic synchronization tools to move messages to new mailboxes on Microsoft 365 (e.g., IMAP Sync).
Conclusion
In this article you saw how you can migrate Google Workspace mailboxes to Microsoft 365 via the Utixo Libraesva ESG service. This is done using the gradual migration method, that is, moving one box at a time without disrupting SMTP communication within the organization. This type of migration can also be extended to migration scenarios that require very granular mail flow control. It allows you to manage SMTP routing rules at the individual mail account level.
Utixo specializes in migrating and managing mail systems for small and large enterprises using migration automation products.